Wednesday, July 29, 2009

Hairband holder


I made this last week and love it for our headbands! LOVE IT!!!

Tuesday, July 28, 2009

Checkbook Cover and the girls sewing Camp tote bags


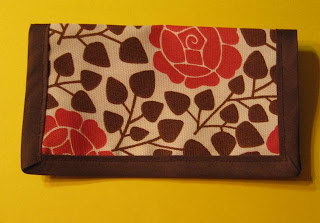
I saw this cute fabric but there was only 1/4 yd left...what to make??? A checkbook cover of course!


Mikayla's totebag she made at Sewing Camp!


Hannah's totebag she made at sewing camp.


The girls at sewing camp.

Monday, July 20, 2009

Ladybug Placemats


We made these out of Red Circle Placemats ($1.50-Walmart) and Felt, black ribbon and chenille pipecleaners..They turned out so cute for the girl's ladybug room!

They are sooo cute in there!!!

Very Cool FlipFlops

i
These are called Shews...I love practicality in its finest...I found that in these flipflops and LOVE them. I love switchflops...but the price is so unpractical...I just can't do it.

These I got for 75% off because the button back was missing...no problem-o...I can tweak some things for $10!

The top has a vinyl opening underneath the button and you can slide the different card stocks through...how cool. Now I just need a pair in brown!!!

Making My Third Skirt


I love these skirts. I found 3 more yards of material that I LOVE. I finished one here and have 2 more to go. Now what am I going to wear when it gets cold...I love these skirts too much..they are way to comfy to wear....I guess I have a while before I have to think about this!

I have made a red one and a black one that I adore too. I think my next ones will be a tad bit longer. I like them to my knees....we will see what I can do.

I made the skirt this afternoon to wear to my party tonight...I love the colors...teal and brown!

Saturday, July 18, 2009

More Clipboards

These are the 6 x 9 size! I am doing these for my sister but I can do them for you too if you like them! The pocket on the back is for sheets of paper that the teachers have to bring to PE Class when they are outside.


Ta-Da! They are finished!


Purple Big PolkaDots


Yellow and pink and brown and orange polka dots.

Friday, July 17, 2009

Crayon Rolls and Clipboards


Back of Hannah's Crayon Roll

Hannah's Crayon Roll filled up!


Crayon Rolls Rolled up


The back side of Mikayla's Rollup


The front side of Mikayla's roll up


I have been on a "roll" in the creating department lately. I saw these online and wanted to try making them. They turned out pretty cute. The vinyl kinda made the fabric a little wonky but they will work for trips and such. I made one for both Hannah and Mikayla. I think when I make another I will either put vinyl on the front and back or just do felt. It will be just as cute, I'm sure!

I've also been making altered clipboards for my sister. I have 9 almost finished and one more to do! They are so cute. Still need to sand them, mod podge and add some extra to them...I think they will be cute!

All the paper measured and cut out.


Every thing glued and pockets for the back mod podged.

Tomorrow I will work on finishing them up!

Thursday, July 16, 2009

Clipboards for tomorrow

I will be making 10 halfsize clipboards tomorow for my sister...Fun!!! Fun!! She's such a good teacher and good leader for her group. She is making them for her teacher's in her group that have to carry a clipboard out to PE with student passes to go back in, a baggie for bandaids and all that kind of stuff you have to haul around just to go outside for PE.

I'll try to post pictures when I'm finished! I am excited to do them!!!

Backseat Car Organizer


In my heart of hearts, I love to organize. In my world of chaos, that rarely happens. I found a tutorial online on how to make these. So I took the idea and tutorial and quirked it up a bit to fit what we needed in our car. I love it! I am adding elastic to the bottom to keep it up against the back of the seat. I cut squares out at the top to put underneath our headrest (I have to take off the headrest off and put them back on to put the organizer on-easy peezy!)

I made it out of black twill. (Bought it at Hobby Lobby with my 40% coupon-yay!) So it was about $5 for a yard an a half (making another one for my Annalise's birthday).

The material I used to make the pockets was something I intended on making a skirt for me but I cut the pattern out the wrong way. I think it will look better on the back of the car seats than the backside of my anyhow...smile!

It took a while to fold and pin all the pockets and get it just the way I wanted it...but it is so the way I want it!

I have a pocket for their drinks (for traveling), their DS, DS Charger, Markers on the top row and on the bottom a place for their DVD's (and a pocket on the front for their DS games) and coloring books or regular books (and a pocket on the front of that for their crayon roll(next on my list to make.))

Sunday, July 12, 2009

Crafty weekend


Headband holder


I made the blue flowered headband to match a skirt I made Hannah.

I have been a busy girl this weekend! Chad let me shop all by myself Saturday and I hit the new Micheals. I also shopped Hobby Lobby and some other stores.

I bought material to make the girls crayon rolls, backseat organizers and my niece's birthday dress.

I can't wait to get started on all those. I had some other things I wanted to work on this weekend...and I got to most of it.

I am so excited to have made 2 skirts this past week. I have 2 skirts that I dearly love but not how they fit when I sit down and stand up...so I searched the web for a tutorial to make my own. I have found that I really like a tutorial over a pattern...even if it means creating my own pattern.

So far this week, I have made two patterns...the one for my skirts and the one for the backseat organizer. I am still working on the organizer pattern trying to decide whether I want to include a pocket for the DVD player or make a separate holder for that.


The last few weeks I've been working on some headbands for the girls. I will try to post photos of those sometime this week, along with the skirts I made.

Today, I made a black skirt, some cute clipboards and felt barrette's (with Mikayla's help). I also threw together some quick headbands for the girls.


Felt Barretts


Bandana Clipboard

Green Funky Clipboard-Back

Front of funky clipboard

Sunday, July 5, 2009

Homeschool Art Supply Caddy

I am very proud of the caddy Chad and I recently put together! Old formula cans that I have hung onto-FOREVER....were just waiting to be made into this. We homeschool so this is an awesome deal for us!!! I found a lazy susan that I won way back in the day when I sold tupperware. It worked perfect!

Step 1-Screw holes in the cans at matching points on all cans. The middle can must have 6 holes spaced correctly to match up to the one hole in each of the other 6 cans.

Step 2. Spray adhesive the scrapbooking paper (after you measure how much you need) to the can. Easy peesy.


Step 3. Put a thin layer of Modge Podge over the paper on the can. Let dry.


Step 4-Take out side and spray a coat of clear sealant on it.
Step 5- Screw the cans together.


This is what it looks like from the inside center. I could have used shorter screws...but this works. We also put on bolts to keep the screws from loosening up.


Step 5-Fill it up with all your goodies!
Mine includes: Scissors, Fat markers, thin markers, color pencils, glue bottles and sticks, rulers, dry erase markers, regular pencils and pens, a few sharpies. I LOVE, LOVE, LOVE it!!!